Taking Photos
Photo Travel
There are two different ways of taking photos in Gran Turismo 6:
- Photo Travel: Take photos of cars in a number of exotic locations.
- Race Photo: Take a photo during a race.
This page will explain the "Photo Travel" feature, accessible from the "Tools" menu.
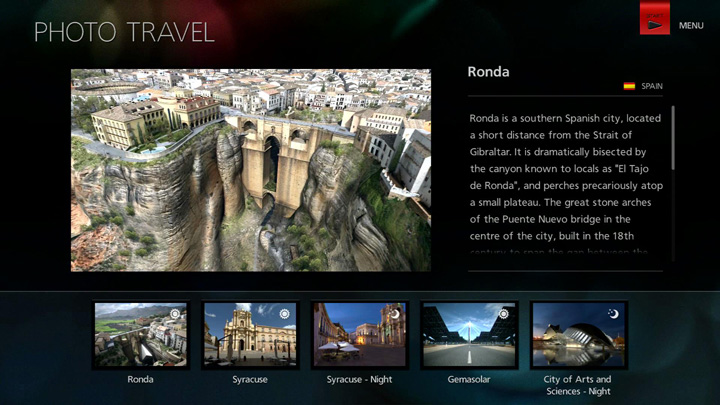
1. Select Location
After you have selected the Photo Travel feature, you will be taken to the Location Selection screen. Select a location to watch a movie of it and gain a better understanding of the kind of place it is. If you wish to take photos in that location, simply press the O button.
2. Select a Camera Location
After you have selected a location, you will proceed to a screen where you can set the camera location. At the top-centre of the screen, provisional locations for the camera and car are indicated with numbers. Use the left and right directional buttons to scroll through these numbers and choose a location for the camera and the car.
Press the triangle button on the Camera Location Selection screen and the following options will be displayed:
- Car Selection
- Select the car you want to use as the subject of your photograph. When you're photographing one car, select "Car 1", then choose the car you want to use. To photograph two cars, go on to select "Car 2" then choose the other car. To remove the second car from the photograph, select "Remove from Stage".
- Avatar Display
- To include your avatar (driver) in the photograph next to the car, set "Avatar" to "On".
3. Walk Mode
Once you've selected a camera location, you will enter Walk Mode. This allows you to move the position of the camera, as well as the positions of the cars and your avatar. Enjoy a walk around the location as you try and find the perfect composition for the photograph. In Walk Mode, the following actions can be performed:
- left stick: Move.
- right stick: Change the direction the camera is pointing.
- O button: Aim the camera.
- SELECT button: Move object.
- X button: Return to the Camera Location screen.
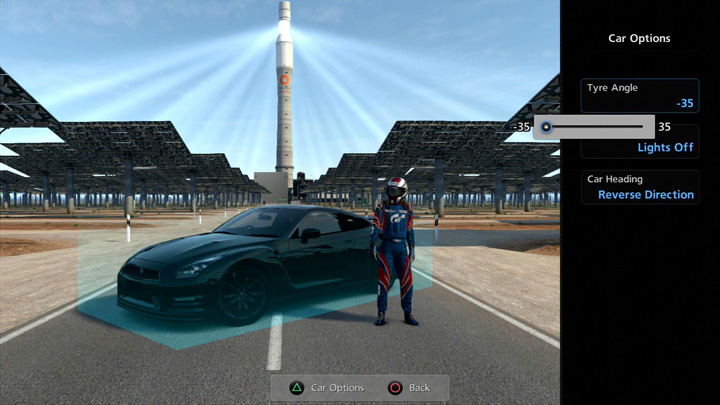
As noted above, pressing the SELECT button takes you into a mode where you can move objects around. In this mode, the following actions can be performed:
- left stick: Move object.
- right stick: Change the way the object is facing.
- triangle button: Car options (Tyre Angle, Lights On/Off, Car Heading).
- START button: Change target (Car 1/Car 2/Avatar).
- X button: Back.

4. Viewfinder Mode
Once you've found the perfect composition for your photo, press the O button to aim the camera and start looking through its viewfinder. This is known as Viewfinder Mode. In Viewfinder Mode, various camera parameter information is displayed at the bottom of the screen, while Camera Menu information is displayed at the top of the screen.
The following actions can be performed in Viewfinder Mode. (Depending on the subject of the photograph, orientation and zoom options may be restricted):
- left stick: Move camera.
- right stick: Change the direction the camera is pointing.
- R1 button + right stick: Zoom/Rotate.
- Directional Buttons: Change parameters.
- L1 button: AE Lock. (Use this option when you want to fix the screen's brightness level. It will lock the automatic exposure function.)
- R2 button: Switch between horizontal/vertical orientation.
- triangle button: Camera Menu.
- square button: Auto-focus.
- X button: Back.
- O button: Shoot.
- SELECT button: Move object.
When you have finished setting up your shot, press the O button to take a photo. After you have taken a photo, you will be given the chance to review the photo you have taken. Examine the photo by using the triangle button to zoom and the right stick to drag. If you want to save the photo, press the O button once again. The photo can then be viewed by selecting "Gallery" from the "My Home" screen and then selecting "Photos".

- © 2016 Sony Interactive Entertainment Inc. Developed by Polyphony Digital Inc.
Manufacturers, cars, names, brands and associated imagery featured in this game in some cases include trademarks and/or copyrighted materials of their respective owners. All rights reserved. Any depiction or recreation of real world locations, entities, businesses, or organizations is not intended to be or imply any sponsorship or endorsement of this game by such party or parties. "Gran Turismo" logos are registered trademarks or trademarks of Sony Interactive Entertainment Inc.
