Create Your Own Tracks
How to Use the GT6 Track Path Editor ③
*The online services for “Gran Turismo 6” have been terminated. The content created with the “Track Path Editor” can no longer be used in-game.
Continued from the previous page, "How to Use the GT6 Track Path Editor ②" (※Screenshots are taken from the iPad version of the app.)
The Three Track Path Editor Modes
The Track Path Editor has three modes which are used when creating track data. (Curbing mode is not available for all themes.)
Once you have set the route of your track in Layout Mode, you can then proceed to either Item Mode or Curbing Mode. (It doesn't matter which comes first.) You can also adjust the route of your track once items and curbing have been put in place, though be aware that this may have an effect on the items and curbs that are already in place. Your track data can be saved at any point during the creation process by tapping the Save button.
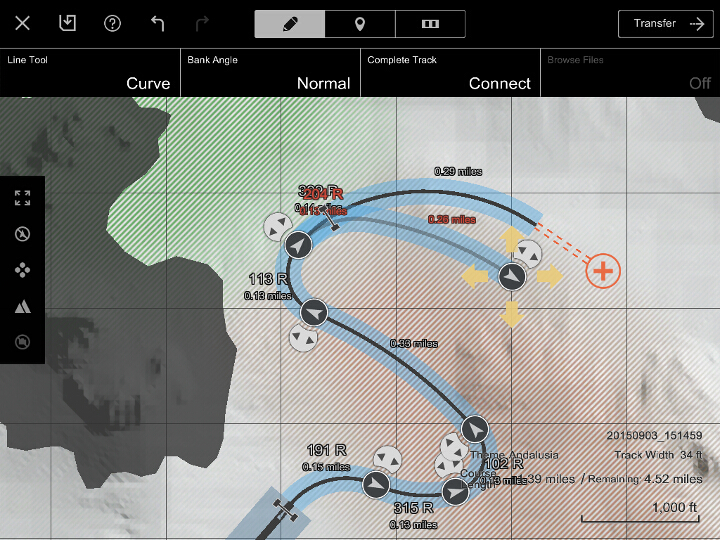
In each mode, the icons listed below will be displayed, either at the top of the screen or to the left of the track map. The number of buttons will vary depending on the mode. (The numbers in red below correspond to the image at the top of the page.)
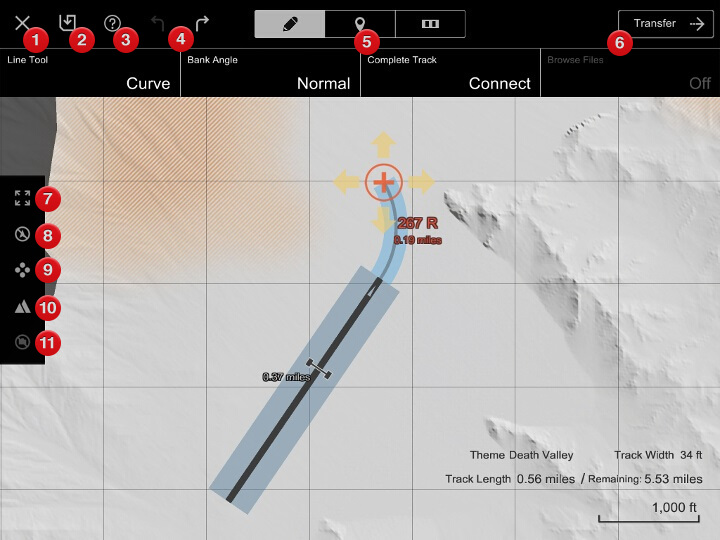
- Return to Home Screen
- Save Track Data
- Display Help
- Undo/Redo
- Switch Modes (Layout/Item/Curbing)
- Transfer Button
- Show Entire Track
- Show/Hide Anchors
- Change Anchor Guide Display Position
- Show/Hide Legend
- Show/Hide Images (Only Available For the Eifel Flat Theme)
Layout Mode
In Layout Mode, you can adjust the route of your track by dragging the track line along the track map. You can create standard circuit-type tracks, of course, as well as "section tracks", where the starting point and finish line are in different places. You can create tracks up to 10,000m / 6.21 miles in length.
If you are using the Eifel Flat theme, you can select the "Browse Files" option to load a GPX/KML image file. This will allow you to trace the track line from that file. Please refer to the "Loading Files" section below for more details.
The following options and information are displayed in Layout Mode:
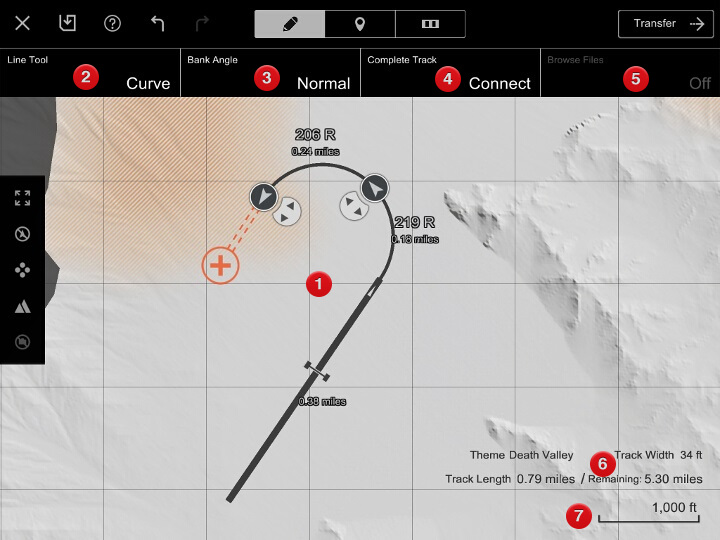
- Map
- This is the map on which you create the track line. The dark grey areas are off-limits, and you cannot place your track line there.
- Line Tool
- Select from a curved or straight track line. You cannot place two straights immediately next to each other.
- Banking
- Set the extent to which your turns are banked. (That is, the camber of the road surface.) This setting will be applied to all corners.
- Complete Track
- Tap "Connect" to connect the end of your track line to the home straight and create a circuit.
- Browse Files
- If you are using the Eifel Flat theme, then you can overlay images of real-life tracks over your track map in order to create similar tracks of your own. Please refer to "Loading Files" below for more details.
- Track Information
- The track theme and track width, current length of the track, and remaining workable distance.
- Scale
- The scale of the map.
Drawing the Track Line
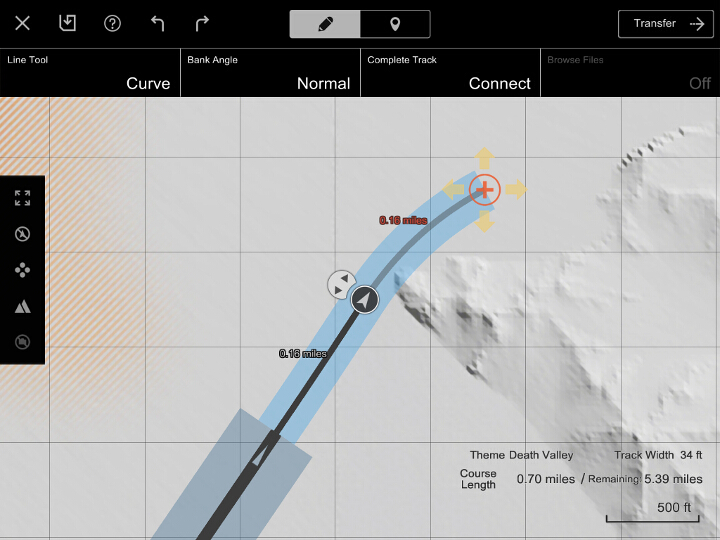
To draw the track line, drag your finger from the end of the home straight to the orange + symbol. Drag this marker and release your finger, and an anchor will be placed. Your track line up to that point is then set.
Use the Line Tool to select whether you're going to draw a curve or a straight. A curve has to be placed immediately after a straight. When drawing a straight using the Line Tool, be aware that the positioning of the straight may well affect the curve that follows it.
If you try and draw the track line too close to the existing track line, or if a turn is too tight, then your track line will be highlighted in red, and an anchor will not be placed. An error message will be displayed when an anchor cannot be placed. Please refer to this message for more details.
Creating Tight Corners
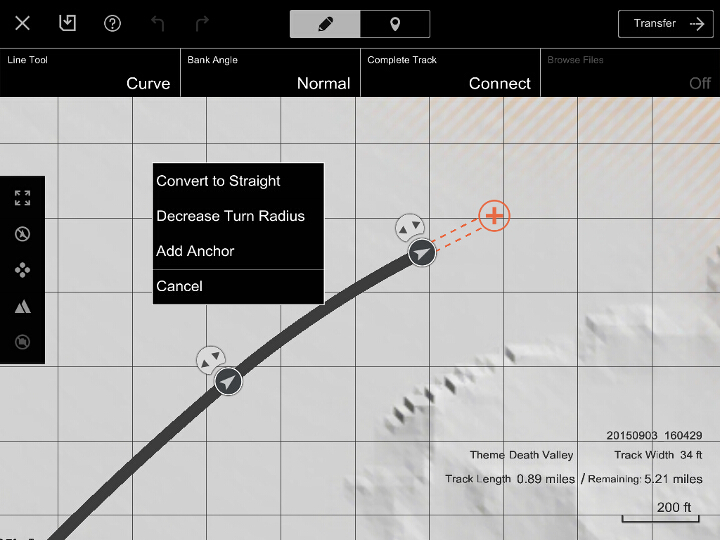
To create tight turns, such as hairpin bends, start by creating an ordinary turn of roughly the type you want by drawing the track line accordingly. This section of track can then be converted into a tighter turn. To do so, tap and hold the section of track you wish to convert, then select "Increase Turn Radius" from the menu which appears. You are not able to place items in sections of track that have been converted to tight corners, but you are able to draw much tighter turns than usual.
To return a section of track that has been converted into a tight turn back to normal, tap and hold the section, then select "Decrease Turn Radius" from the menu which appears. Please be aware that this action cannot be performed if the section contains a turn that is too tight for a normal section of track. If this is the case, adjust the track line so that the turn is less tight, then try again.
Fixing the Track Line
You can fix your track line by adjusting the positions of its anchors. Anchors can be both moved and rotated. To move an anchor, simply drag it with your finger. To rotate an anchor, drag the anchor guide that's attached to it to turn it left and right. When you move or rotate an anchor, the track line on either side of it will be adjusted automatically.
You can also add and remove anchors. To add an anchor, tap and hold the location on the track map where you'd like to add one, then select "Add Anchor" from the menu which appears. To remove an anchor, tap and hold the anchor you'd like to remove, then select "Delete" from the menu which appears.
A section of track line you have already drawn can be converted from a straight into a curve and vice-versa. Tap and hold the section of track you'd like to convert, then select "Convert to Curve/Straight" from the menu which appears. If you convert a curve into a straight, the track line which follows it will be adjusted automatically.
The Start Point and Finish Line
When you're creating your track data, the start point and finish line will be displayed on the track line. If your track is not connected to both ends of the home straight, then your track will be considered a "one-way track". This means that the start point will be on the home straight, while the finishing line will be on the section of track furthest from it. On one-way tracks, the sections before the start point and beyond the finishing line are not counted as part of the track distance, and are considered "marginal areas". Be sure to incorporate these marginal areas into your thinking when drawing your track lines for one-way tracks.
If your track line is connected to both ends of the home straight, then the finish line will no longer be displayed. Both the start point and the finish line will be on the home straight. Please note that the start point for one-way tracks and the start point/finish line for circuit tracks are in different positions on the home straight.
Loading Files
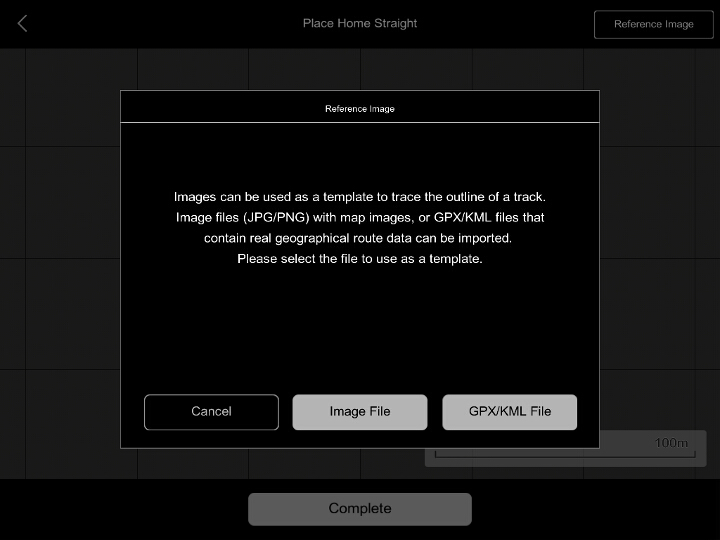
If you are using the Eifel Flat theme, then you can overlay images of track layouts on your track map during the creation process, allowing you to trace the route of real life tracks. The following two file types can be used:
- JPG or PNG format image files.
- GPX/KML files that contain driving data displayed on a map.
Please note that when you are creating a track using the Eifel Flat theme, a 600m home straight is required as part of your track route.
- Referencing Images
In order to reference an image when creating tracks, the image files or GPX/KML files must already be saved on your tablet device. Please save image files wherever photos are stored on your tablet. Please refer to "Loading GPX/KML Files" below for details on where to save GPX/KML files. When saving image files, it's useful to have an indicator of the image's approximate scale displayed somewhere on the image.
On the Theme Selection Screen, select "Eifel Flat", then tap "Reference Image" in the top-right corner of the screen. Select either "Image File" or "GPX/KML File" from the dialogue which appears. The first time you select "Image File", the app will ask for permission to access the location on your tablet where images are saved. Tap "Agree" to proceed. A list of files will be displayed. Tap the file you want to use, and it will be overlaid on your track map.
Once the image is displayed, you can adjust its size and orientation. Shrink or enlarge the image so that the scale displayed on it matches the scale displayed on the track map. The gridlines displayed on the track map are also an useful visual aid. Drag the image to move it, and pinch in and out to shrink and enlarge it. Tap and hold the image with two fingers then twist to rotate it. Once you have finished adjusting the scale of the image, tap "Accept" at the bottom of the screen. If you are using a GPX/KML file, the scale will be adjusted automatically, and you will be unable to shrink or enlarge the image.
Once you have tapped "Accept", the anchor and anchor guide that are used to determine the position and alignment of the home straight will be displayed on the map. Move the anchor so that the home straight is in the most appropriate position. Use the anchor guide to adjust its alignment. If the home straight is difficult to see, enlarge the map. Tap "Accept" and the home straight will be placed in the selected location.
Once the home straight is in place, create your track line by tracing the route displayed on the image. Try and enlarge the map as much as possible when tracing the route, and place lots of anchors to ensure that the image is replicated accurately. If the route features a complex corner where the tightness of the bend varies, you will need to place multiple anchors in order to replicate it.
You can also browse and load files from within Layout Mode. The loaded image can be hidden and re-displayed as necessary at any time.
- Loading GPX/KML Files
The method for loading GPX/KML files is different for iOS and Android™ devices. It is also possible that the method for loading these files will change when your OS is updated. Furthermore, it is possible that large files cannot be loaded.
- On iOS:
- On Android™:
If you are using an iOS tablet device, then GPX/KML files are loaded using iTunes. Please ensure that iTunes has been installed on the computer which contains the GPX/KML files you wish to load. Connect your tablet to the computer, and launch iTunes. Once your tablet device has been recognized, its icon will be displayed on the left side of the iTunes window. Click on this icon, then click on "App" (also displayed on the left side of the iTunes window). A list of the apps on your tablet decide will be displayed on the right side of the window. "Share Files" will be displayed towards the bottom of this list. Select "Track Path Editor" from "Share Files", and a list of all its files will be displayed on the right side of the window. Drag and drop the GPX/KML files you wish to load into this area.
In the app, select "Reference Image" followed by "GPX/KML File" to display a list of files. Tap the file you wish to load and it will be overlaid on your track map.
If you are using an Android™ tablet device, you will need to save your GPX/KML files in your device's download folder or on an SD card. This can be done by connecting your device to a PC, or by downloading the files from cloud storage. Please refer to your device's instruction manual for more details.
In the app, select "Reference Image" followed by "GPX/KML File" to display a list of folders. Select the folder in which your files are saved, then tap the file you wish to load and it will be overlaid on your track map.
Instructions for using the Track Path Editor continue on the next page, "How to Use the GT6 Track Path Editor ④".

- © 2016 Sony Interactive Entertainment Inc. Developed by Polyphony Digital Inc.
Manufacturers, cars, names, brands and associated imagery featured in this game in some cases include trademarks and/or copyrighted materials of their respective owners. All rights reserved. Any depiction or recreation of real world locations, entities, businesses, or organizations is not intended to be or imply any sponsorship or endorsement of this game by such party or parties. "Gran Turismo" logos are registered trademarks or trademarks of Sony Interactive Entertainment Inc.
