Taking Photos
The Camera Menu
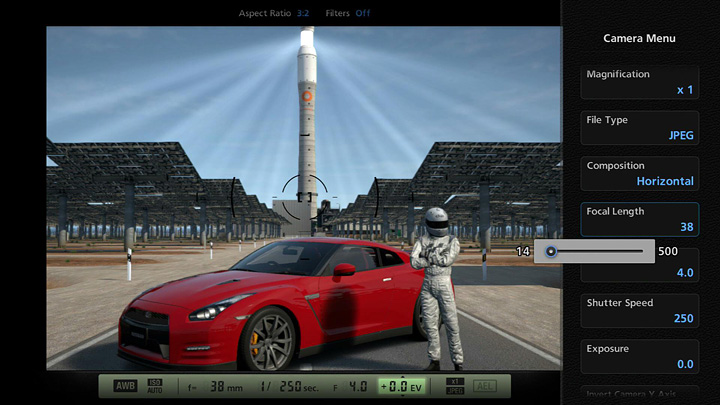
Aim the camera while taking a photo and you'll enter Viewfinder Mode. Pressing the triangle button in this mode will bring up the Camera Menu, from where various settings can be adjusted. Perfect your technique and take photos that will make you the envy of your friends!
The Camera Menu contains the following options:
- Aspect Ratio
- Change the image's horizontal/vertical ratio. The best aspect ratio for 35mm film is 3:2. To fill an HD TV screen, 16:9 is the best aspect ratio. The best aspect ratio for a profile picture is 1:1. Photos with aspect ratios other than these will be trimmed automatically.
- Filters
- Apply treatments to your photos to provide a range of effects. The following filters are available:
-
- Monochrome: Exclude color information from the photo to produce a black-and-white image.
- Extreme Monochrome: Produce a black-and-white image with stronger black gradations.
- Sepia: Produce a dark brown photo that looks like it was taken using faded black-and-white film.
- Cool: Produce an image with a blue tone. The areas around the edge of the image become darker.
- Warm: Produce an image with a red tone. The areas around the edge of the image become darker.
- Cross-Processing (1-3): Produce an image with a deliberately disrupted color balance.
- Miniature: Obscure the front and rear parts of the subjects you're photographing, making it look like you're taking a photo of a miniature car. This is particularly effective when taking "bird's-eye view" photos, among other things.
- Partial Color: Make the subject at the center of an image stand out by making the edges of the image monochrome. This is particularly effective when you are photographing a colorful subject.
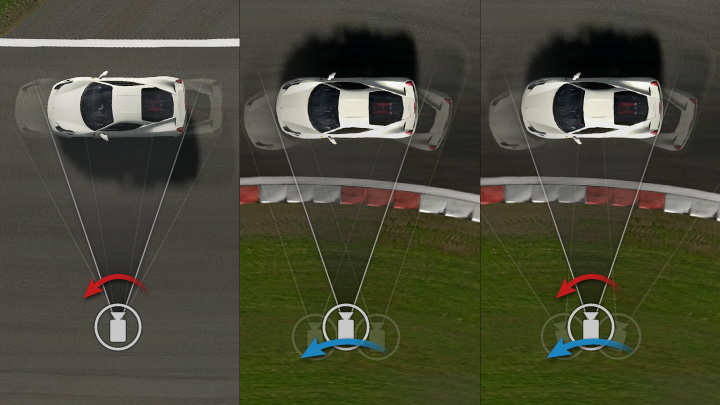
- Panning (Race Photos Only)
- Panning is a photography technique which involves moving the camera in accordance with a moving subject. With a slower shutter, the background will look blurry, emphasizing the feeling of speed.
- From this menu, you can set the kind of panning effect you'd like. The following three modes are available:
-
- Mode 1: Pan by swinging and tilting the camera around from a fixed point. The distance between the camera and the car will change slightly, with the effect of slightly obscuring the car in the image.
- Mode 2: Pan by moving the camera around, following the car. When photographing a car that's turning, the focus will be on the central part of the car, obscuring its front and rear extremities.
- Mode 3: Pan by moving the camera around, following the car, and also tilting and swinging the camera so that it always faces the car directly (left image, right). Only the background will be blurred, and the car itself will look sharp in the image.
- Magnification
- Set the photo size (no. of pixels). If you intend to print the image on a large piece of paper, please set this to x2.
- File Type
- When your system is connected to a 3D TV, please set this to "3D Photo (.mpo)" to ensure your photos are outputted as 3D-compatible images. If you do not wish to take 3D photos, simply select "JPEG".
- Composition
- Set either horizontal or vertical composition.
- Focal Length
- Change the size of the area that is photographed. Moving the slider to the left widens the angle, meaning that a larger area is photographed. Moving the slider to the right means a smaller area is photographed at greater magnification.
- Adjusting the focal length doesn't just affect the size of the area that is photographed. When you are focused on one point, there is an area around that point that also appears to be in focus. "Depth of field" refers to the size of this area, where everything appears in focus. With a wider angle, depth of field is increased (meaning the area that appears in focus is larger). With a narrower angle, depth of field is reduced (meaning the area that appears in focus is smaller). By placing the camera farther away from the subject and using a narrower angle, you can make the subject stand out more.
- F-stop
- Depth of field is not only affected by focal length - changing the F-stop also affects it. Moving the slider to the left decreases depth of field, whereas moving it to the right increases it. Adjusting the F-stop in this manner does not affect the brightness of the screen. Because this setting allows you to change the depth of field without moving the camera, it's easy to produce the effect of switching between narrow and wide angles.
- Shutter Speed
- Set the speed at which the shutter opens and closes. Moving the slider to the right increases the shutter speed, allowing you to take sharp photos of moving objects. On the other hand, moving the slider to the left decreases the shutter speed, allowing you to create impressive images with blurry backgrounds. Adjusting shutter speed in this manner does not affect the brightness of the screen.
- Exposure
- When you take a photo, the exposure is controlled automatically, ensuring that the amount of light is just right for the subject. You can, however, adjust the exposure deliberately, thus controlling the amount of light the subject receives. The default setting is 0.0 (in the middle of the gauge). Moving the slider to the left will make your photo darker; moving it to the right makes it brighter. If you are photographing a backlit subject, there may be times when it's better not to use automatic exposure.
- Invert Camera Y Axis
- Invert the camera controls, so that when you use the Right Stick to change the direction the camera is pointing, it moves in the opposite direction to the direction in which you pushed the stick. This setting gives you the sensation of operating a camera on a tripod using a handle. Select "Yes" and pushing the stick downwards will tilt the camera upwards, and vice-versa.

- © 2016 Sony Interactive Entertainment Inc. Developed by Polyphony Digital Inc.
Manufacturers, cars, names, brands and associated imagery featured in this game in some cases include trademarks and/or copyrighted materials of their respective owners. All rights reserved. Any depiction or recreation of real world locations, entities, businesses, or organizations is not intended to be or imply any sponsorship or endorsement of this game by such party or parties. "Gran Turismo" logos are registered trademarks or trademarks of Sony Interactive Entertainment Inc.
